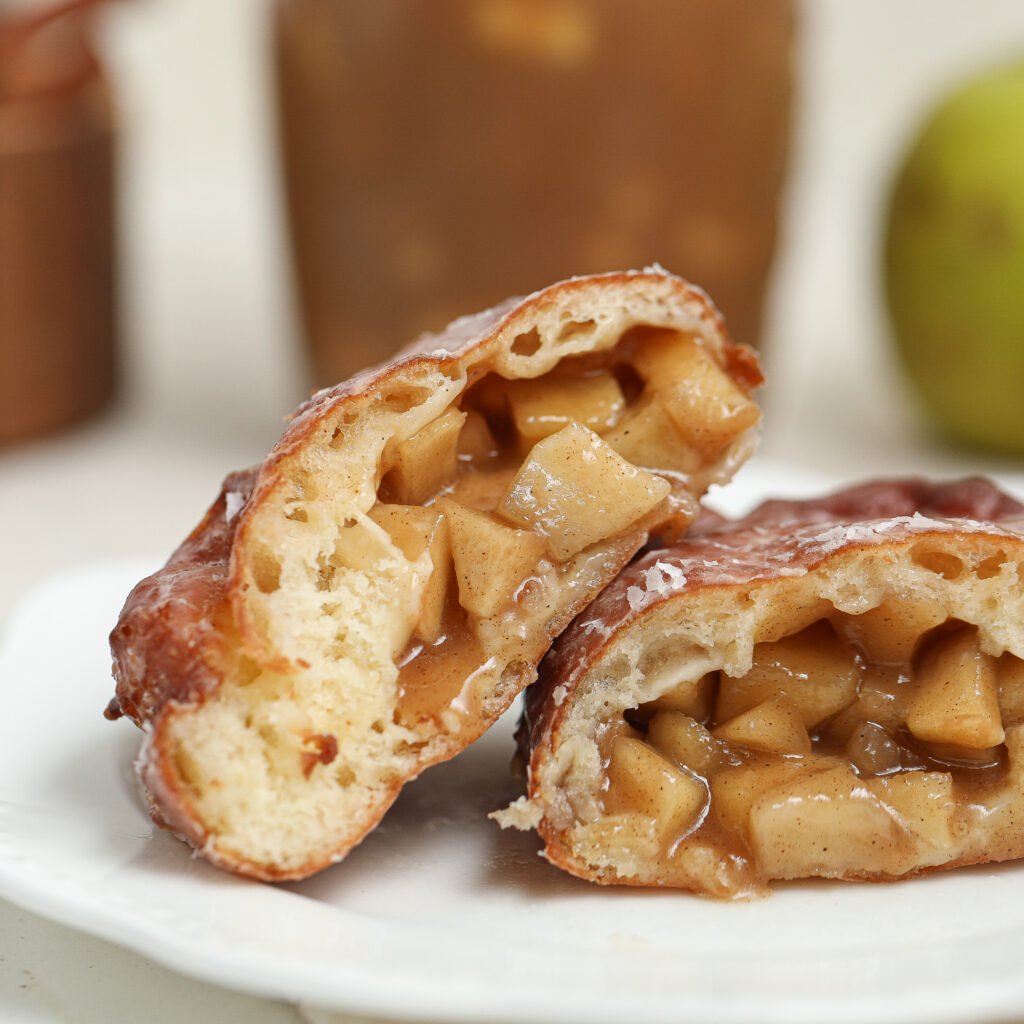
Fried Apple Doughnut Hand Pies with Sweet Maple Glaze
Apple Doughnut Hand Pies are like the best of both worlds: crispy fried doughnuts and flaky apple pie, all in one handheld treat. Each pie is made with soft yeast dough, filled with warm apple pie filling spiced with cinnamon, nutmeg, and cloves, then fried until golden brown and drizzled with a sweet maple glaze.
They’re cozy, indulgent, and perfect for when you want something that feels like a fairground pastry but tastes homemade. The process is simple: make the dough, cook the apple filling, shape, fry, and glaze. With just a little prep, you’ll have pastries that taste like they came straight from a bakery display case.

As an Amazon Associate I earn from qualifying purchases.
Why You’ll Love Apple Doughnut Hand Pies
- Warm apple pie filling: Granny Smith apples simmered with cinnamon and spice for classic flavor.
- Golden brown texture: Fried dough gives these hand pies a crisp bite with a tender inside.
- Sweet maple glaze: A simple whisk of powdered sugar, maple syrup, and milk finishes them off.
- Make-ahead friendly: Prepare the apple filling ahead and store it in the fridge.
- Perfect fall treat: A cross between mini apple pies and doughnuts, with all the cozy flavors.

Ingredients Needed To Make Apple Doughnut Hand Pies
Make sure you scroll down to the recipe card to see the full list of ingredients needed for this recipe.
Dough
- All-purpose flour
- Instant yeast
- Eggs
- Butter (melted and cooled)
- Warm milk
- Sugar
- Salt
- Vanilla extract
Apple Filling
- Granny Smith apples
- Lemon juice
- Sugar
- Salt
- Ground cinnamon
- Ground cloves
- Ground nutmeg
- Water
- Cornstarch (with cold water for slurry)
Maple Glaze
- Powdered sugar
- Maple syrup
- Milk
Frying
- Beef tallow, Canola or vegetable oil

Variations, Tips, and Substitutions
- Switch the apples: Use Honeycrisp or another firm variety if you want sweeter filling.
- Make baked hand pies: Place on a parchment-lined baking sheet, brush with egg wash, cut slits on top, and bake at 375°F for 25–30 minutes until golden.
- Add extra spices: A pinch of cardamom or lemon zest brightens the apple filling.
- Sweet topping trick: Sprinkle coarse sugar over the glaze for extra crunch.
- Storage: Keep leftovers in an airtight container at room temperature for 1–2 days or refrigerate up to 4. Reheat briefly in the oven for best texture.
How To Make Apple Doughnut Hand Pies
- Make the dough: In a stand mixer bowl, whisk together warm milk, eggs, sugar, vanilla, and melted butter. Add flour, yeast, and salt. Knead until the dough is sticky but pulls away from the bowl. Cover with plastic wrap and let rise until doubled.
- Cook the filling: In a stockpot, stir together apples, lemon juice, sugar, salt, cinnamon, cloves, nutmeg, and water. Cook until apples are tender. In a small bowl, whisk cornstarch with water, then stir into apples to thicken. Cool before using.
- Shape the pies: On a lightly floured work surface, roll out the dough to ¼ inch thick. Use a pastry cutter or round cutter to cut circles. Place apple filling in the center, fold into a half-moon, and press edges with a fork or fold over to seal.


- Fry the hand pies: Heat oil in a Dutch oven to 350°F. Fry hand pies in small batches until golden brown, about 3 minutes per side. Drain on a wire rack lined with parchment paper.

- Glaze: In a small bowl, whisk powdered sugar, maple syrup, and milk until smooth. Dip warm pies or drizzle glaze over the top. Let set before serving.

Commonly Asked Questions
Can I make the apple filling ahead of time?
Yes. Store in the fridge in an airtight container for up to 3 days. Make sure it’s cooled before sealing inside dough.
Do I have to fry these?
No. You can bake them instead using pie dough or the yeast dough version. Bake on a cookie sheet until golden brown.
What’s the best way to seal the pies?
Use a fork to crimp the edges, or fold the seam over once more for extra strength so the filling doesn’t leak.
Can I freeze apple hand pies?
Yes. Freeze before frying/baking. When ready, thaw slightly, then fry or bake as directed.
What’s the difference between these and mini apple pies?
These hand pies use yeast dough fried like donuts, while mini apple pies usually use pie crust baked in pans. The texture is softer and fluffier, like a pastry-doughnut hybrid.

Apple Doughnut Hand Pies with Maple Glaze
Equipment
- Stand mixer with dough hook
- 5” round biscuit cutter
- Stockpot (for apple filling)
- slotted spoon
- Deep skillet or Dutch oven (for frying)
- Wire rack + parchment paper squares
Video
Ingredients
Dough
- 4 ¾ cups all-purpose flour or 1.1 gluten-free flour + ~½ cup extra for rolling
- 2 ¼ tsp instant yeast 1 packet
- 2 large eggs
- 10 tbsp butter melted and cooled (includes +2 tbsp edit)
- 1 ⅓ cups warm milk no hotter than 110°F
- ⅓ cup sugar
- 1 tsp salt
- 2 tsp vanilla bean paste or extract
- Canola or vegetable oil for frying
Apple Pie Filling
- 5 cups Granny Smith apples peeled and thinly sliced
- ½ lemon juiced
- 1 cup sugar
- Pinch of salt
- 1 tsp ground cinnamon
- 1/16 tsp ground cloves
- 1/16 tsp ground nutmeg
- ½ cup water
- 2 tbsp cornstarch + 3 tbsp water for slurry
Maple Glaze
- 2 cups powdered sugar
- 3 tbsp maple syrup
- 4 tbsp milk
Instructions
Step 1: Make the Dough
- In a stand mixer bowl, combine warm milk, eggs, sugar, vanilla, and melted butter. Mix briefly.
- Add yeast, flour, and salt. Mix on low, then increase to speed 3. Knead for 7–9 minutes until sticky but pulls away slightly from the bowl.
- Cover and let rise in a warm spot until doubled, about 1–2 hours.
Step 2: Prepare the Apple Filling
- In a stockpot, add apples, lemon juice, sugar, salt, cinnamon, cloves, nutmeg, and water. Stir to combine.
- Cook over low–medium heat for 15 minutes, stirring occasionally, until apples are tender.
- Whisk cornstarch + water in a small bowl. Stir slurry into apples and cook 2–3 minutes until thickened.
- Cool before using.
Step 3: Shape the Hand Pies
- Lightly flour a work surface. Roll out risen dough to ~¼” thick.
- Use a 5” round cutter to cut circles.
- Place 1 ½ tbsp apple filling in the center.
- Fold dough over into a half-moon shape. Press edges to seal, then fold seam again like an empanada for extra strength.
- Place pies on parchment squares.
Step 4: Fry the Hand Pies
- Heat oil in Dutch oven/skillet to 350°F.
- Fry hand pies 3 minutes per side, or until deep golden brown.
- Transfer to wire rack to drain.
Step 5: Glaze
- Mix glaze ingredients until smooth.
- While warm, dip or drizzle pies with maple glaze.
- Place on wire rack until glaze firms.
Nutrition
Apple doughnut hand pies with maple glaze are made with warm apples, cinnamon, and fried dough all in one. They’re a little rustic, a little indulgent, and every bite delivers that sweet maple drizzle over tender, spiced apple filling. Whether you fry or bake them, these hand pies are guaranteed to be a cozy favorite you’ll want to make again and again.