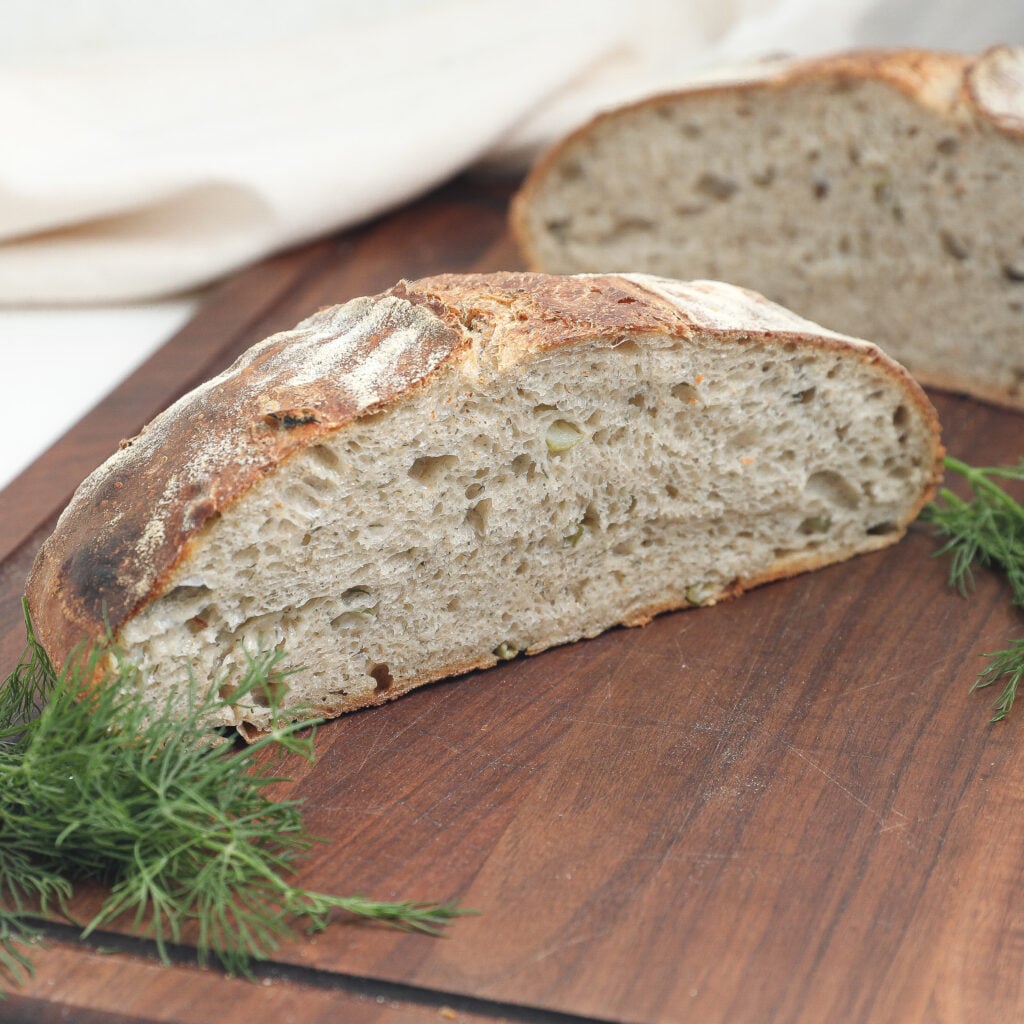
Dill Pickle Sourdough Bread Recipe (Tangy and Crunchy)
If you’re a sourdough fan who also happens to love pickles, buckle up, because Dill Pickle Sourdough Bread is about to become your new obsession. This loaf takes everything you love about classic sourdough, the chewy crumb, the bubbly rise, the golden crust, and adds a tangy, garlicky punch from chopped dill pickles and dried dill. The result is a flavorful bread that pairs beautifully with cheese, ham, salmon, or just toasted with a swipe of butter.
Yes, it takes time, thanks to bulk fermentation and fridge proofing, but the hands-on prep is just a series of folds and shaping. The inclusions of pickles keep the dough lively and give you a bread that’s anything but boring. Once it cools, slice it up for a sandwich, grill it for toast, or tear off a hunk to enjoy with a bowl of soup.
As an Amazon Associate I earn from qualifying purchases.
Why You’ll Love Dill Pickle Sourdough Bread
- Tangy pickle flavor: Chopped dill pickles bring briny, garlicky flavor into every bite.
- Perfect sourdough texture: Stretch and folds plus bulk fermentation create bubbles and a chewy crumb.
- Crispy golden crust: A hot Dutch oven ensures a golden brown surface with crackling crust.
- Versatile serving options: Enjoy it with cheese, cured meats, or even alongside salmon.
- Fun sourdough project: A creative twist that stands out from the usual sourdough recipes.

Ingredients Needed To Make Dill Pickle Sourdough Bread
Make sure you scroll down to the recipe card to see the full list of ingredients needed for this recipe.
- Bread flour
- Whole wheat flour
- Active sourdough starter
- Water
- Olive oil
- Fine sea salt
- Dried dill
- Chopped dill pickles
How To Make Dill Pickle Sourdough Bread
- Feed your sourdough starter so it’s active and bubbly.
- Mix the flours, water, olive oil, dill, chopped pickles, and starter in a large bowl until a rough dough forms.
- Cover and let it rest before adding salt.
- Do your first set of stretch and folds, working salt into the dough. Repeat a few more times to build gluten and surface tension.
- Let the dough rise during bulk fermentation until doubled.
- Shape the dough gently with damp hands and place it seam-side up in a banneton or floured proofing bowl.
- Cover and proof at room temperature, then refrigerate overnight in a plastic bag.
- Preheat a Dutch oven in a hot oven. Score the top of the dough and bake covered, then uncovered, until golden brown.
- Let the loaf cool on a rack before slicing to preserve texture.

Oven Temperatures
Oven temperatures can vary significantly from one oven to another. To achieve consistent results, it’s crucial to know the exact temperature inside your oven. The safest and most accurate way to determine this is by using an oven thermometer. This simple tool can help you avoid underbaking or overbaking your treats.
Variations, Tips, and Substitutions
- Use fresh dill: Swap dried dill for fresh if you want a brighter flavor.
- Add pickle brine: Replace some water with pickle juice for extra tang.
- Try different inclusions: Garlic powder, rye flour, or cheese can boost flavor.
- Prevent excess moisture: Pat pickles dry before folding them in so the dough doesn’t get soggy.
- Serve it creatively: This bread makes an amazing grilled cheese, or toast it and top with salmon or ham.
Commonly Asked Questions
Can I use pickle juice instead of water?
Yes! Swap some of the water for pickle brine to deepen the flavor. Just be mindful of the added salt since pickle juice is briny.
How do I stop my loaf from getting too wet with the pickles?
Pat the chopped pickles dry with a paper towel before adding them. Too much excess moisture can make the dough slack and hard to shape.
Do I have to use a Dutch oven?
A Dutch oven gives the loaf its golden crust and helps with oven spring, but you can also bake on a sheet pan or baking stone with a pan of water in the oven to create steam.
How should I store dill pickle sourdough bread?
Keep it wrapped in a clean tea towel or paper bag at room temperature for up to 3 days. For longer storage, slice the loaf, wrap in parchment, and freeze in a freezer bag. Toast slices straight from the freezer for quick snacks.
What’s the best way to serve it?
It makes an amazing sandwich bread, especially with ham and cheese, or grilled with butter. It also pairs beautifully with salmon, soup, or a charcuterie board.
Dill Pickle Sourdough Bread
Equipment
- Stand mixer with dough hook (optional)
- Plastic wrap + kitchen towel
- Bread basket or proofing bowl
- Clean tea towel
- Dutch oven (recommended for baking)
- Bench scraper
- Bread lame or sharp knife (for scoring)
Ingredients
Instructions
Read First –
- Starter: Feed starter ~4 hours before making the dough so it’s active and bubbly.
- Salt Tip: Add salt after the starter and flour. Sprinkle on top of flour, never directly on the starter.
- Mixing Options: Hand mix or use a stand mixer on setting 3 until just combined.
- Too Dry? If dough seems dry at the beginning, add a light sprinkle of water.
Step 1: Initial Mix (No Salt Yet)
- In a large bowl, combine bread flour, wheat flour, water, dill pickle juice, olive oil, dried dill, chopped dill pickles, and active starter. Mix until a rough dough forms. Cover with plastic wrap and a towel. Let rest 30 minutes.
Step 2: Incorporate Salt + Begin Folds
- Sprinkle salt over dough. Do your first set of 4 stretch-and-folds, working the salt into the dough. Repeat every 30 minutes, 4 times total (over 2 hours).
- Note: After the first fold you may notice water pulling out. This is normal and resolves as gluten develops.
Step 3: Bulk Fermentation
- Cover with plastic wrap and a towel. Let rest at room temp 6–12 hours, or until doubled. Do not overproof.
Step 4: Shaping
- Shape gently with wet hands. Place seam-side up in a floured proofing basket or bread bowl. Pinch the seam to seal.
Step 5: Final Proof
- Cover basket with towel, place in a proofing bag. Let rest on counter 1 hour, then refrigerate 24 hours.
Step 6: Bake
- Preheat oven with Dutch oven inside to 475°F. Remove dough from fridge, score the loaf, and transfer into Dutch oven. Bake covered 20 minutes, then uncovered 20–25 minutes until crust is golden brown.
Step 7: Cool & Serve
- Let bread cool fully on a rack before slicing. Cutting too early can affect the crumb texture.
Nutrition
Dill pickle sourdough bread might sound quirky, but once you try it, you’ll understand why it deserves a spot in your regular bake rotation. It’s crunchy, tangy, chewy, and just plain fun. I love pulling it out of the hot Dutch oven, hearing that crust crackle, and knowing the bubbles inside baked up beautifully. This loaf has quickly become a go-to for sandwiches, cheese boards, and late-night snacking.