
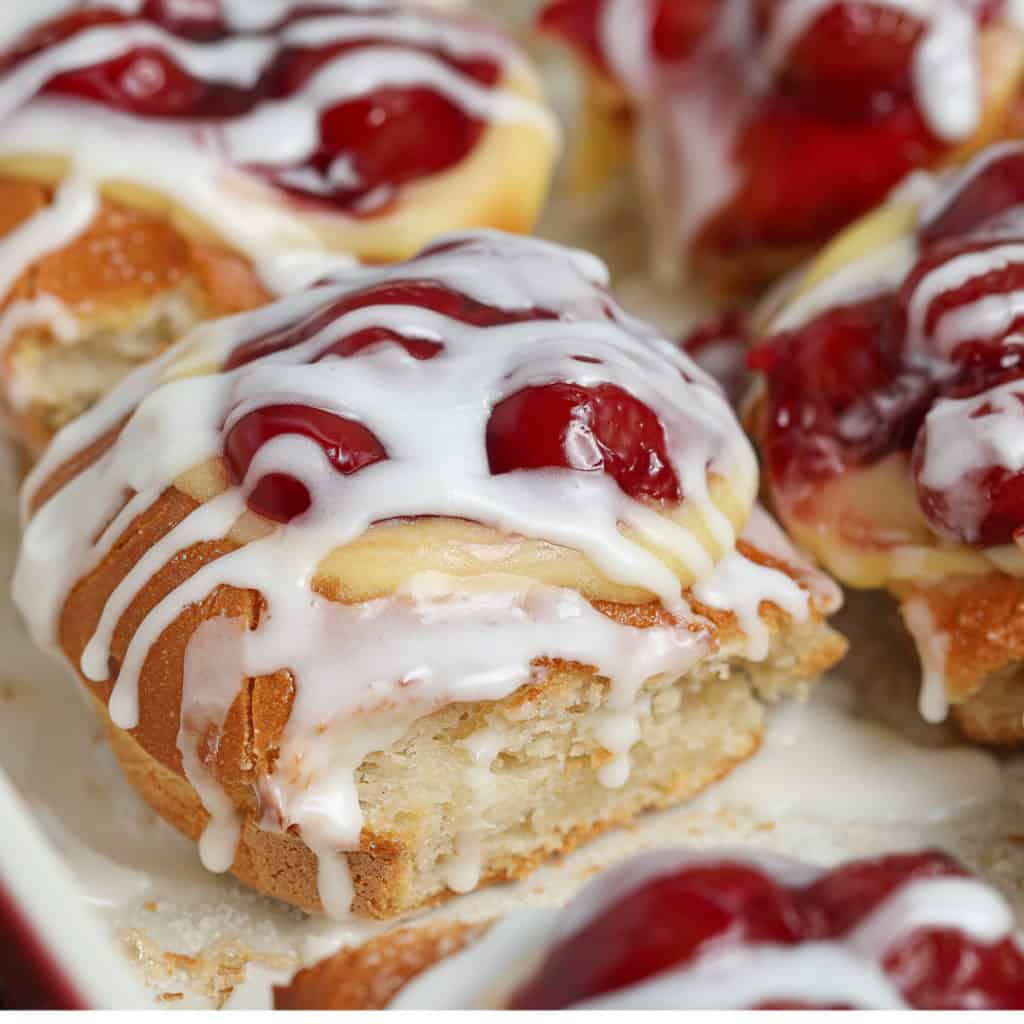
Cherry Cheesecake Danish Sliders
These cherry cheesecake danish sliders are made with soft Hawaiian rolls, a creamy cheesecake filling, sweet cherry pie filling, and a simple glaze. They bake up warm, soft, and lightly golden, making them perfect for brunch, holidays, or an easy breakfast that feels a little special.
As an Amazon Associate I earn from qualifying purchases.
Why You’ll Love Cherry Cheesecake Danish Sliders
- Quick and Easy: These sliders come together in no time, making them a perfect choice for busy mornings or when you need a sweet fix in a hurry.
- Deliciously Sweet: The cream cheese filling, combined with the cherry pie topping and sugary glaze, offers a heavenly sweetness that satisfies your sweet tooth cravings.
- Perfect for Any Occasion: Whether it’s a lazy weekend breakfast, a brunch gathering, or a dessert treat, Cherry Danish Sliders add a touch of indulgence to any occasion.
- Versatile and Adaptable: You can easily customize these sliders by trying different fruit fillings or tweaking the glaze to suit your taste preferences.
- Kid-Friendly Fun: Kids love the sweet combination of cherries and cream cheese, making this recipe a family favorite.
Ingredients Needed To Make Cherry Cheesecake Danish Sliders
- Sweet bread slider buns
- Cream cheese
- Powdered sugar
- Lemon juice
- Egg yolk
- Cherry pie filling
- Sugar
- Egg
- Water
- Powdered sugar (for glaze)
- Milk (for glaze)
How To Make Cherry Danish Sliders
- Preheat the oven to 375 degrees.
- Use a paring knife to cut a well in each slider roll, being careful not to cut all the way through.
- Mix cream cheese, powdered sugar, lemon juice, and egg yolk until smooth.
- Whisk together water and egg. Brush the egg wash onto the sides of the sweet rolls.
- Sprinkle the sides with sugar.
- Pipe the cream cheese filling into the hollowed-out slider buns.
- Top each bun with cherry pie filling.
- Bake for 12-15 minutes until lightly golden and warmed through.
- Remove the Cherry Danish Sliders from the oven and allow to cool slightly.
- Whisk together powdered sugar and milk. Drizzle over each Danish.
Best Rolls for Cherry Cheesecake Danish Sliders
Soft Hawaiian rolls work best for these sliders because they hold their shape while baking and stay soft in the center. They also give you that classic pull-apart texture that makes these easy to serve for brunch or gatherings.
How to Keep Danish Sliders from Getting Soggy
Use a small knife to cut a shallow pocket in the top of each roll, leaving the bottom and sides intact. This gives the cheesecake filling and cherry topping a place to sit without soaking through the roll.
Avoid overfilling the sliders, and bake them until the rolls are lightly golden and the filling has set. Let them cool for a few minutes before glazing so the centers firm up a little.
Commonly Asked Questions
Can I use a different fruit filling?
Absolutely! Try using blueberry, apple, or any other fruit filling you love.
Can I make these Cherry Cheesecake Danish Sliders in advance?
While they’re best fresh, you can prepare the components ahead and assemble just before baking.
What if I don’t have a paring knife?
Any small, sharp knife will do the trick for cutting the well in the slider rolls.
Can I freeze Cherry Cheesecake Danish Sliders?
It’s recommended to enjoy them fresh, but if you have leftovers, they can be frozen and reheated later.
How long should I bake these sliders for?
The bake time will vary by oven. You want them to bake between 10-15 minutes. They should be lightly golden and warmed through.
How do you keep cherry danish sliders from getting soggy?
Cut a well in each roll, avoid overfilling, and bake until the edges are lightly golden. Let them cool slightly before serving so the filling sets.
How do you store cherry cheesecake danish sliders?
Store leftovers in an airtight container in the refrigerator for up to 3 days. Reheat in the oven or air fryer until warmed through.

Cherry Cheesecake Danish Sliders
Equipment
- 1 baking sheet or baking dish
Video

Ingredients
Cherry Cheese Danishes
- 6 Sweet bread slider buns (like hawaiian rolls)
- 8 ounces cream cheese
- 1/4 cup powdered sugar
- 1 tsp lemon juice
- 1 egg yolk
- 1 cup cherry pie filling
- 2 tsp sugar
- 1 egg
- 1/4 cup water
Glaze
- 1 cup powdered sugar
- 2 tsp milk may need 3 tsp depending on how thick it is
Instructions
- Preheat the oven to 375 degrees.
- Using a paring knife to cut a well in each of the slider rolls, careful not to cut all the way to the bottom and to also leave the sides intact.
- Add the cream cheese, powdered sugar, lemon juice, and egg yolk to a bowl. Mix until smooth and silky.
- Whisk together the water and egg. Brush the egg wash onto the sides of the sweet rolls.
- Sprinkle the sides with the sugar.
- Pipe the cream cheese filling into the hollowed-out slider buns.
- Top with each bun with cherry pie filling.
- Bake the cherry Danishes for 12-15 minutes. You are looking for them to be lightly golden and warmed through.
- Remove from the oven and allow to cool slightly.
- Whisk together the powdered sugar and milk. Drizzle over each Danish.
- Enjoy!
Just made these with regular ingredients that I had. They are wonderful! I highly recommended this recipe.
Thank you so much!!! Happy you enjoyed them! There will be a new slider recipe coming soon too!
Can you use the tub of cheesecake filling in refrigerated section if making more than 6 danishes?
yes, you can!
I made these delicious pieces of Heaven, but with dairy (not the dairy free version) and I had to actively stop myself from eating the entire batch. My family who aren’t gluten free LOVED them and are anxiously awaiting when I will make more.
Yay!! so happy you and your family loved it!
I’ve tried many of The Salty Cooker recipes by Danielle. One of my favorites are Cheesecake Sliders. I made two batches for a family picnic: some were topped with blueberry pie filling; others with cherry pie filling.
Love the creativity of using Hawaiian sweet rolls as the base. What could be easier than that? This recipe is so delicious! I dare you to find any cheesecake recipe that could even compare to these cheesecake sliders!
Thank you Donna!!!
I have made these 4 times in the last 4 months and they are amazing! My family and friends who can eat gluten absolutely love when I make these. I use dairy in mine because I am not dairy free FYI. I was missing danishes so much until I found this recipe on Instagram and the best part is how easy they are to make!
I love this!!!